So far, our camera is able to create a depth map and determine the distance of a pixel upon the click of a mouse.
But that’s just half a Terminator. We need our ‘terminator’ to be able to say: “There is a person standing there. The person is x meters away. Attack!”
If you haven’t read through Part 1 and Part 2 of this series, please do so to better understand this part!
How this will work
- Run SSD-Mobilenet-v2 Object Detection model using TensorRT.
- Combine the object detection with our Depth Map.
- Determine the centroid of the object detection bounding box.
- Map the (x, y) coordinates of the Centroid to the depth map, and obtain the depth value from the 2D matrix of the depth map.
- Show the distance.
Loading the Object Detection Model
To do Object Detection in this series, we will be using Nvidia’s jetson-inference repository which is a part of their Hello AI World tutorial series.
The Hello AI World tutorials are a great way to start with AI and Deep Learning projects on Jetson products. Go check it out!
We will build Nvidia’s jetson-inference project from source. This may take some time and will run you through certain installations, so just be patient!
Visit this site and follow the steps OR key in the following commands into your terminal.
$ sudo apt-get update
$ sudo apt-get install git cmake libpython3-dev python3-numpy
$ git clone --recursive https://github.com/dusty-nv/jetson-inference
$ cd jetson-inference
$ mkdir build
$ cd build
$ cmake ../
$ make -j$(nproc)
$ sudo make install
$ sudo ldconfig
All these commands are taken from Nvidia’s tutorial. If you face any error, make sure to check their site in case certain changes were made to the installation process.
During the installation…

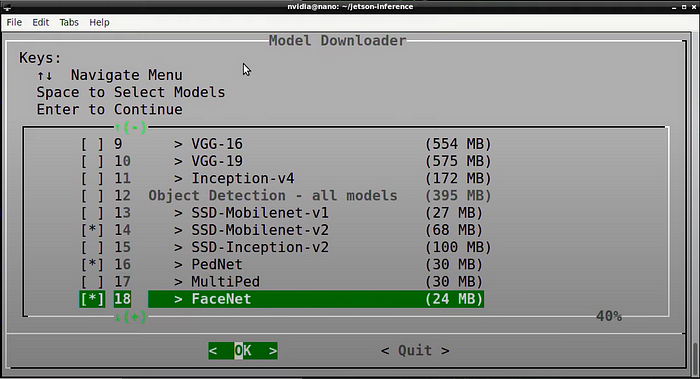
You will see this screen to download some Deep Learning models. You may choose to unselect all of them except the SSD-Mobilenet-v2, since that is what we will be using for this project.
Testing the installation
Before we move on to the next step, let’s check if our installation was successful. Open your terminal and type:
$ python3
>>> import jetson.utils
>>> import jetson.inference
If you are able to import both modules successfully, it means that we are good to go! If you face any error regarding the jetson module being missing, go check the jetson-inference installation site again and ensure all steps were followed.
Testing the Object Detection model
Alright! Now that we have everything installed, let’s run the Object Detection model.
Navigate to /home/jetson-inference/python/examples/
and then run python3 my-detection.py
The model will take about 5–8 minutes the first time you run it.
If the images are inverted, use:
python3 my-detection.py --flip-method=rotate-180 csi://0For more details, check out this video:
How far is that man standing?
We have our object detection model running. We also have our depth map. Now it’s time to combine the two!
If you have cloned my StereoVision repo previously, you will find a 6_depthwithdistance.py file in the main_scripts folder. That’s all you need!
Navigate to the /home/StereoVision/main_scripts/ directory and run:
python3 6_depthwithdistance.py .
This is what you should see. I modified the Python scripts such that the model only detects people so as to avoid interference from other objects in the surroundings.
If you wish to detect other objects, modify the objectDetection function from 6_depthwithdistance.py.
You can learn about the different item_class for objects in the COCO dataset from here. Just remember that item_class is the index and hence starts from 0, therefore unlabeled=0, person=1, bicycle=2, etc.
To better understand the detectNet package, check out this page. From here you can learn what is returned by jetson.inference.detectNet.Detection.
Want to delete the jetson-inference folder?
We had to follow the guide from jetson-inference to install the jetson module onto our machine. However, we don’t want the entire folder to unnecessarily consume storage on our Jetson Nano.
Currently, we cannot delete the jetson-inference folder since the Object Detection model is installed in it. So let’s move the model to our StereoVision directory!
Download the model
You could navigate to /home/jetson-inference/data/networks/ and copy the SSD-Mobilenet-v2 folder to the StereoVision directory.
Or…
Head to the releases page and download the two files into /home/StereoVision/SSD-Mobilenet-v2/ .

Modifying 6_depthwithdistance.py
We need to change the path from which ssd-mobilenet-v2 is being loaded.
As shown above, comment the current line that is loading the ssd-mobilenet-v2 model, and uncomment the following 3 lines.
Make sure to change --model=/home/aryan/StereoVision/SSD-Mobilenet-v2/ssd_mobilenet_v2_coco.uff to your own path.
Now we can finally delete the jetson-inference folder.
We can also use this method to load different deep learning models. Just make sure to change the different arguments accordingly.
Try running 6_depthwithdistance.py again, it should work!
Congratulations!
We have completed this tutorial and have learned so much along the way! Dipping our toes in both Stereo Vision and Object Detection (Deep Learning) is a great way to get started!
Please do leave a comment if you expand this project or have any feedback! Thanks for reading!
